 Creating a free membership portal on your website is a great way to deliver content, generate a user/email list, and build authority within your market.
We started using a free membership portal for our free stock photos to ease the administration of delivering the images via email. While it works for a lot of people using newsletter emails to deliver content, I personally found it time consuming setting up the appropriate download links and visual content.
After a bit of research, we decided that a walled content section within our website would be the best solution. This way new content and images could be added easily, members/users would have 24hr access in their own time with no extra administration from us, a win win for both parties.
As our portal content was image-based there was not much information out there on building membership websites that distribute images, and so I have rebuilt the membership portal three times now as our needs evolved. Using different WordPress membership plugins along the way, I have now become quite familiar with the quirks of each.
Having originally set the portal up with Membership2, I since moved the portal to Paid Memberships Pro due to caching issues with Varnish which could not be resolved. I also tested WooCommerce’s Membership plugin, however as WooCommerce’s member registration is processed through the shopping cart system, I believe it is overkill with too many actions for the user to take to be a member of the free membership portal.
Introducing Paid Memberships Pro
Paid Memberships Pro is a great choice for building a free membership portal, as it is itself a totally free plugin to use. There is great documentation/support available at a small cost of $97/year and as with any great WordPress plugins there are heaps of add ons to adjust the plugin better to your requirements.
Today we are going to run through setting up a free membership portal with members email syncing to a MailChimp email list.
First up, via your WordPress dashboard’s plugin page install Paid Memberships Pro and Paid Memberships Pro MailChimp add-on, and activate both plugins.
Navigate to the new menu item called Memberships at the bottom of the dashboard menu and the main plugin settings should load.

Before adding a membership we should correctly set the plugin first, so navigate to the second tab called Pages. Within this tab you can select the pages that you wish to function as the main pages for your membership portal. Or I would recommend clicking on the “click here to let us generate them for you” for the plugin to automatically set up the default pages. (Don’t forget to click save at the bottom too!)

Moving on to the Payment Gateway tab, now technically as we will set our membership cost to $0 there is no need to change anything here. However, if you check the Payment Gateway setting to ‘Pay by Check’ this will stop several unnecessary scripts from running on your website.
Lastly move to the Email tab and enter the appropriate details for the From Email and From Name fields.
Now let’s move back to the Memberships Levels tab, and create a new membership level; enter the Name, Description and Confirmation Message (the welcome message upon signing up). The rest of the fields, including price can be left blank, and finally click save.
Your free membership portal is now active! Time to put some content into it.
Membership Content
There are two options for adding and restricting content to your portal; you can use a dedicated members category to restrict blog posts to members, and/or use pages. As most membership content is static, I would recommend using pages. However, if you wish to create blog posts for members only, navigate to the bottom of the membership settings page that you just created and tick the categories that you wish only your members to see, and again click save. An example would be if you were adding new podcasts regularly, these could be posts.
If you wish to add some pages to the membership portal, navigate to the page menu in the dashboard to create a new page, add your page title and content, and then tick the checkbox in the “Require Membership” metabox on the right. For existing pages simply edit these pages to require membership.

And so that’s it, pretty simple, isn’t it? Now let’s link up the MailChimp add-on for Paid Membership Pro to sync our members email addresses with an email list that is in MailChimp.
Membership & MailChimp Integration
Firstly, in your WordPress dashboard navigate to your plugins page and check that the Paid Membership Pro MailChimp add-on is activated, then navigate to Settings > PMPro MailChimp to configure the settings.
Before we can proceed and configure this page you will need to login to your MailChimp account to retrieve your MailChimp API key. So open another browser tab and login to your MailChimp account.
Within your MailChimp account navigate to your account settings via your profile image in the top right corner, hover over this image or your name and a menu will appear, click on the Account menu item.

On your accounts page, next hover over the Extras menu item and another menu will appear, select the API keys menu item.

Scroll down to the “Your API keys” section and you will find your keys. Copy the relevant one that you would like to use. If you do not have any API keys use the “Create a Key” button at the bottom of this section to generate one. I would recommend you create a new key for each separate website you link to.

Once you have copied the API key to your clipboard, navigate back to the browser tab that has your WordPress dashboard, and paste your API key into MailChimp API Key field at the top of your general settings section then click save settings.
After the page reloads you should notice that your MailChimp lists have been brought into the “All Users List” and “Opt-in list” sections. The All Users list is the MailChimp list that you wish any user of your website, i.e. subscribers, customers, authors and editors; not just the members . The Opt-ins list adds an opt-in option for each list selected on the membership sign up form on the front end to allow users to opt-in.
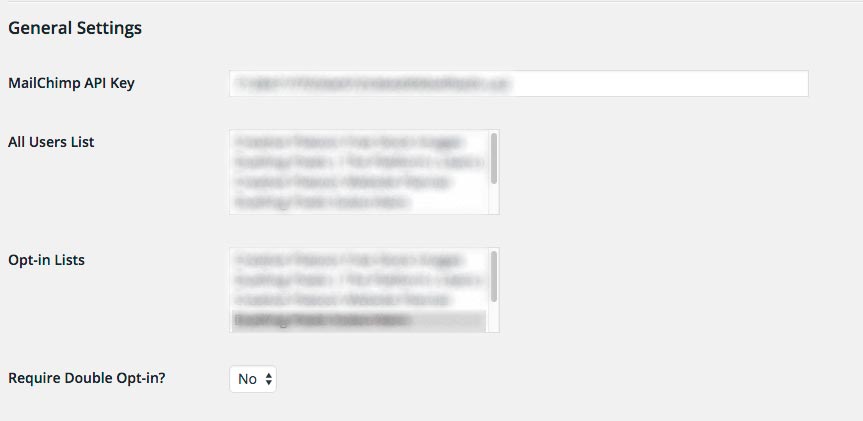
Select which MailChimp list you would like your users to be automatically added to for the “All user list”, and select which MailChimp list you would like to appear as an opt-in option on the sign form. Make no list selection if you wish no user to be added. Note: you can select a single list or a number of lists that the user data will sync with.
At the bottom of the page there is also a list selection box for each of your memberships. Again select which list you would like your membership users to be automatically added to. It is worth noting at this point that a separate MailChimp list can be used for each membership.
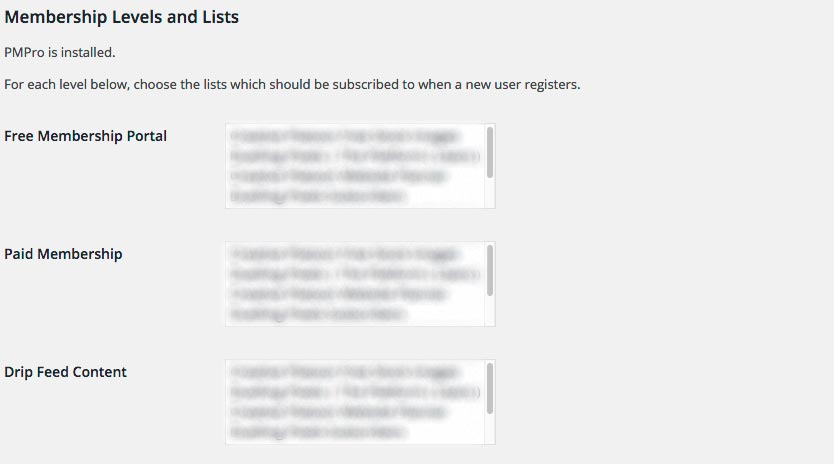
Make sure you click save to save all settings.
That should be it, you now have a free membership website that syncs membership user names and email addresses to your selected MailChimp List. Time to focus on that content for your users!
Leave a Reply