

First up, let’s make a plan!
This is where most e-commerce websites go wrong, or costs sky rocket out of control. With a lack of a plan each decision you make as you go along will impact your choices further into the WooCommerce store step up, and you may not like those available choices.
From our experience, most e-commerce websites take months to get launched after the initial development, as the owner has not entirely thought through the online and offline components right to the end. We try to tell them, but it’s just in one ear and out the other.
Detailing out a plan, and working out from the start how many items you are going to sell, where you are going to sell to, which payment gateways you are going to use, and how are your customers going to receive your goods, this will not only give you confidence in the website set up, it will also make the website set up a lot easier and a lot less stressful.
Actually, map out the expected process for the buyer, and detail out each point. Yes, EVERY little point, from how the user lands on your home page before navigating to your online shop catalog, to will they use a side menu to sort through products or use the main menu.
Here are some quick points that you should have covered in this plan.
Product
- What are you selling and not selling?
- How many products are you going to have?
- What categories and tags will they be sorted by?
Design
- How will the user navigate around you website, is there going to one or two menus, and where will these menus be?
- Will your products have images, and how many per image?
- What information will there about each product?
Store
- What payments are you going to except?
- What notifications and communication will the buyer receive after purchasing a product or service?
- What legal documents do you need to have for state and federal laws?
- What tax do you need to collect?
- How will the customer receive their purchased goods?
- If shipping products, whats costs and processes are involved with sending the products.
These are not the all of items that your plan should cover, but it should at least get you started. And remember the more you outline in the plan the easier it will be to implement the store. And the more RELAXED you will be with the implementation.
To keep it simple in the series of blog posts we are going to take you through the setup of e-commerce store operating out of Melbourne, Australia, that will sell to Australian customers only. From this guide you will be able to modify the setup to your location, and your customer’s location. We are also going to integrate Paypal and Strip payment gateways to offer payment flexibility for the customer, and lastly we will integrate Australia Post for the delivery of items.
All of this will be achievable for the cost of…. NOTHING! Marvellous WordPress! Well it’s not not entity free, there is your time to put it together and of there is the time developers used to put the software together that they give away for free. So please make sure you give the plugin developers a nice rating on the WordPress plugin directory.
We are going to make a few assumptions, including that you have WordPress installed and a SSL certificate installed. If you do not have a SSL certificate installed please contact your website host about installing one. If you are planning to add a store to your existing website, I would strongly recommend that you deploy the e-commerce section on a duplicate copy of your website before deploying it on your live website to make sure there are no issues that might occur.
Ok, are you ready to start?
![]()
Installing WooCommerce
To start with let’s install the required plugins – WooCommerce, Paypal and Strip payment gateways and Australia Post plugins. Login to your WordPress website and navigate to Plugins > Add new.
Move to the Search Plugins field on the right hand side, and type in “WooCommerce”, a large list of WooCommerce related plugins will be appear ( 2,597 items in total). Hopefully, you should be able to see plugin just labelled “WooCommerce”, by WooThemes.
Click the install button for this plugin and then activate the plugin on the following screen.
![]()
Once activated you should see notice at the top of the screen as follows “Welcome to WooCommerce – You’re almost ready to start selling :)” with Run the Setup Wizard button, click on this button.
![]()
Running the Setup Wizard
This will launch a full screen on boarding 5 step process that will take you through the basic store step up, which includes setting up store pages, setting store location, currency, product weight units and product measurement units. Please note all the settings can be changed at a later date within the WooCommerce settings, so don’t feel you have to answer all of them.
Lets go through each page:
![]()
After reading the welcome message and a confirmation that you would like to proceed, the first page details out the page set up required to run WooCommerce correctly. Lucky, we can hit the continue button and the pages will automatically be set up for us.
On the next screen, you can set your store location, click on the country drop down and simply type ‘Australia’ in the field for first question, and a list will appear with a choice of Australia States to select as location. Once your location has been set, the following questions will automatically populate with the correct currency and unit measurements that are standard in your country. These should be ‘Australian Dollars ($’), ‘kg’ and ‘cm’ respectively, confirm the inputs and click continue.
![]()
Moving on to the Shipping & Tax screen, if you are selling a downloadable product and are not collect GST Tax you can simply skip this section and click continue. If you are planning to ship items or charge GST let’s quickly run through this section.
The basic shipping module that comes default with the plugin uses a standard shipping cost on a per order basis or a per item basis. As we are planning to add Australia Post integration to our e-commerce store, we can skip over this question.
If you will be charging GST, tick the ‘Will you be charging sales tax?’ checkbox, then enter whether the pricing will be inclusive or exclusive of GST. Unfortunately, as the defaults of the WooCommerce plugin is geared towards the good old U.S.A., there are no Import Tax Rates to import. We will run through setting up GST tax rates later on in these tutorials.
Clicking continue we move onto the Payments screen, this will give you option to select which default payment options you would like to setup. The default online payments are Paypal and the default offline payments are Cheque Payments, Cash on Delivery and Bank Transfer (BACS). If you wishing to use Paypal enter you email address for your Paypal account and tick the corresponding checkbox for each offline payment you would like to offer your customers.
And finally the last screen, which has nothing to set. Yeah!! Either select the “Create your first Product” button or the “Return to the WordPress Dashboard” text at the bottom of the module to return to the dashboard.
![]()
Now that you have completed the basic WooCommerce setup, technically you are ready to go and can add a few products to your store and start selling. However, this is a very basic store that doesn’t give many payment options for your customers, a rudimentary shipping setup that you could lose money on. So, let’s take your store a bit further down the ‘developed” line and give our customers a better shopping experience so you can sell more products.
![]()
Installing WooCommerce add on plugins
To extend our e-commerce store with the functionality that our customers are more suited to we need to extend WooCommerce with some extra plugins. For the Stripe payment gateway there are many plugins available in the WordPress Plugin that you can use, for this lesson we are going to run with the officially WooCommerce supported plugin. Open a new browser tab and head over to WooThemes and download a free copy of their Stripe plugin.
Once downloaded, jump back to your Dashboard browser tab and navigate to Plugins > Add New. Familiar territory? This time we are going to upload the plugin instead of installing from the WordPress plugin directory. At the top of the page, next to the Add Plugins title, click on the Upload Plugin button, then click on the Choose File button. Select the zip file that your just downloaded which should be called “woocommerce-gateway-stripe.zip”, upload it to your WordPress install and once uploaded activate the plugin.
While we are in the admin plugin install page, lets install our Australia Post integration plugin, navigate to the Plugins > Add New and search for Australian Post WooCommerce Extension by Waseem Senjer. As with before once you have found the right plugin, click the install button and activate.
![]()
WooCommerce Store Details
Ok, we have the WooCommerce add ons installed, lets check through the rest of our newly added store settings, navigate to WooCommerce > Settings, and you should see a screen with 7 tabs across the top will load up, which are General, Products, Checkout, Accounts, Emails and API.
We will run through these tab by tab, and setting by setting to ensure you will be familiar with each one. Please fell free to jump ahead at any point, and grabbing a coffee now is also a great idea! No really, I mean it, grab that coffee or cup tea!
General Tab
General Options
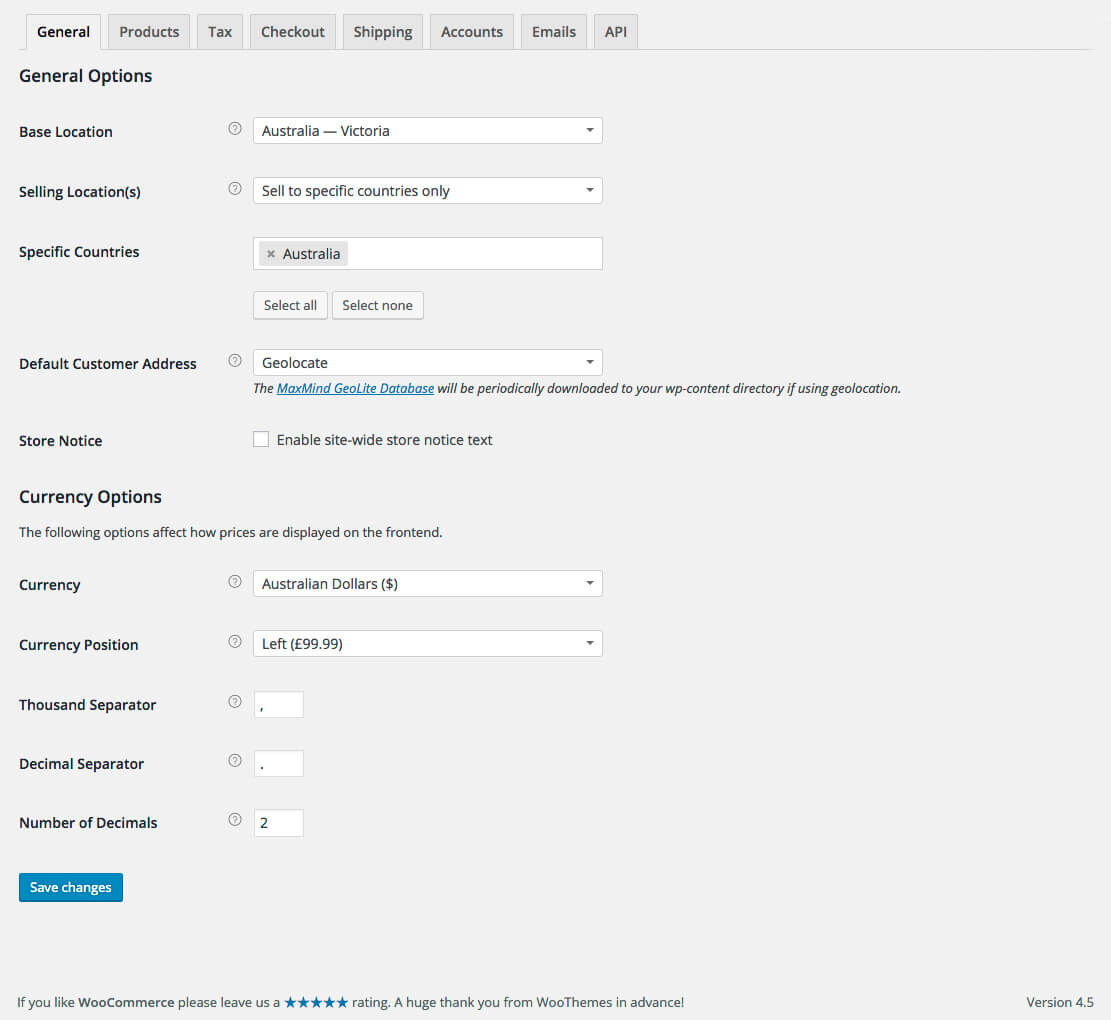
Base Location – This is your store base location, this should be already set to the configuration that was set during the on boarding process.
Selling Location(s) – This is the location/s where you are willing to sell to, as we will only selling to Australians, set this to Australia.
Default Customer Address – This allows you to predetermine the customer’s location before they enter their shipping address via the user’s IP address to determine their location. As we want to only to sell to Australians we are going to set this to Geolocate.
Store Notice – this give you an option to set a store notice that will appear at the top of the page, a good option to use while you set up our e-commerce store.
Currency Options
Currency – Should match the configuration on that was set during the on boarding process, otherwise adjust as required.
Currency Position – Set the position of the dollar sign
Thousand Separator – Set the character for the thousand dollar separator
Decimal Separator – Set the character for the thousand dollar separator
Number of Decimals – Set the number of decimals places to be used.
Save Changes!
Products Tab
General
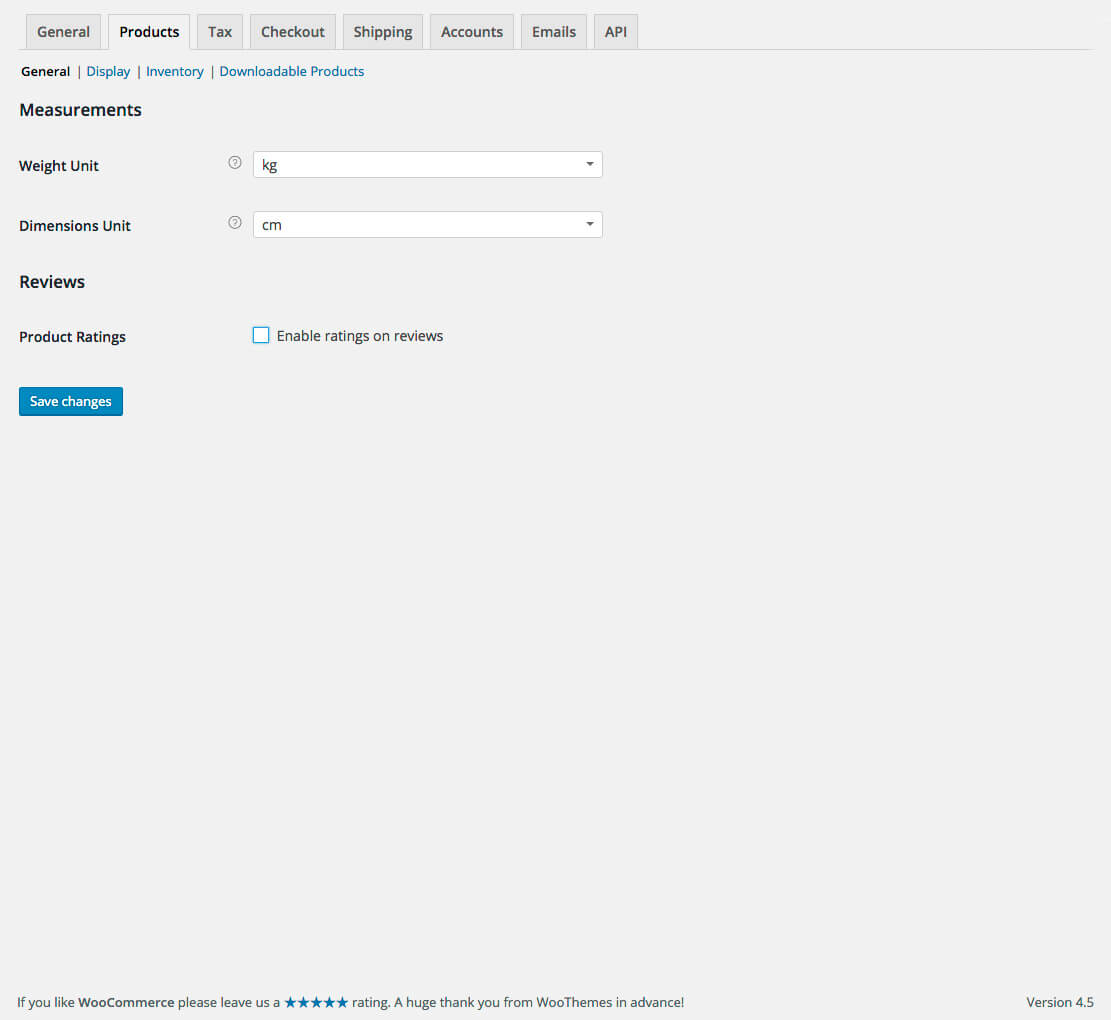
Measurements
Weight Unit – Should match the configuration that was set during the on boarding process, otherwise adjust as required.
Dimensions Unit – Should match the configuration that was set during the on boarding process, otherwise adjust as required.
Reviews
Product Ratings – Are you going to have product ratings or not? We would suggest that it is best to leave it off at the moment.
Save Changes!
Display
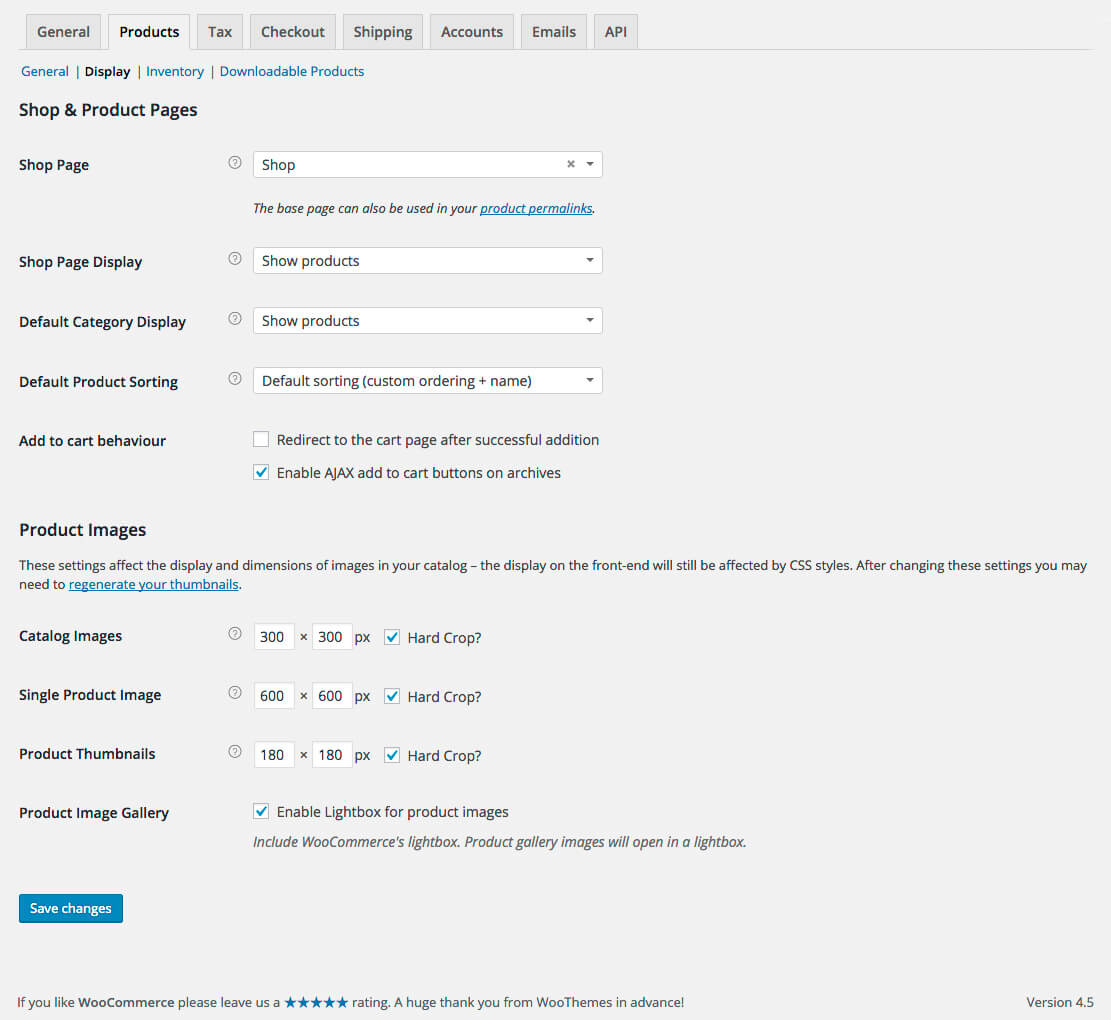
Shop & Product Pages
Shop Page – the page that your product will display on, this should match the configuration that was set during the on boarding process, otherwise adjust as required.
Shop Page Display – Select whether to show products, products categories or mixture of both.
Default Category Display – When viewing a product category, would you like your users to see the subcategories or the products of the category.
Default Product Sorting – Select how you would like your products to be sorted.
Add to cart behaviour
Options:
Redirect to the cart page after successful addition, ie send the customer straight to the cart page to complete purchase after adding a product to the cart.
Enable AJAX add to cart buttons on archives – removes page reloading after a customer has added an item to the cart.
Product Images
This options set the main image sizes for the products on the various shop pages. Please take note that after adjusting the image size changes you will need to regenerate the thumbnails to reproduce the images the new size.
Product Image Gallery – Option whether to have a Lightbox view on product image or not.
Inventory
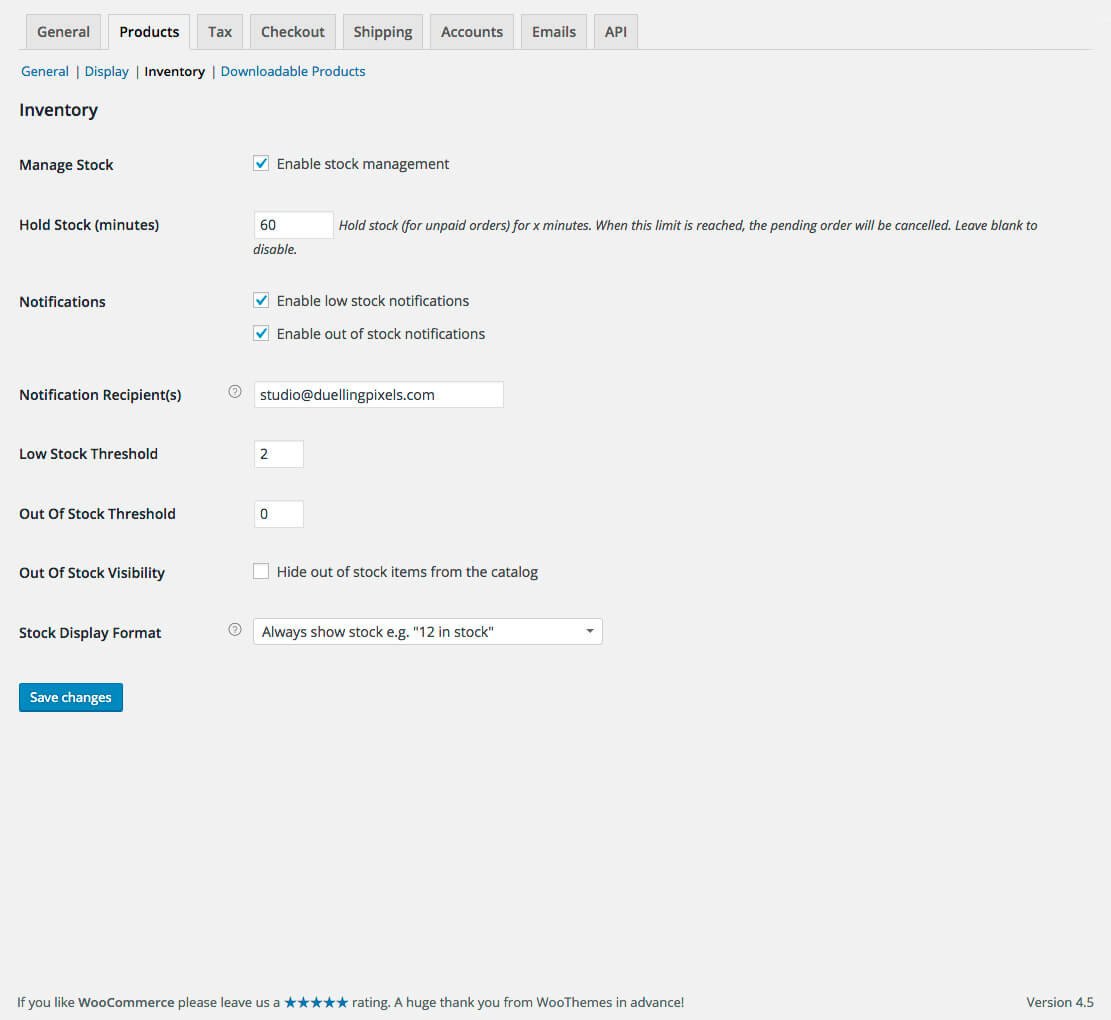
Manage Stock – Select whether to manage stock quantities or not. If you are selling non psychical goods like ebooks or downloads this should be left unchecked.
Hold Stock (minutes) – How many minutes should the stock item be held for in an unpaid shopping cart before the purchase is cancelled and the item place back in the store.
Notifications – Turn on low stock / no stock stock notifications
Notification Recipient(s) – The email address the notifications should be sent to.
Low Stock Threshold – Low threshold notification point.
Out Of Stock Threshold – Out of Stock notification point.
Out Of Stock Visibility – if an item is out of stock, should customer still be able to view it on the store.
Stock Display Format – Option on how to display stock levels, select your preference.
Downloadable Products
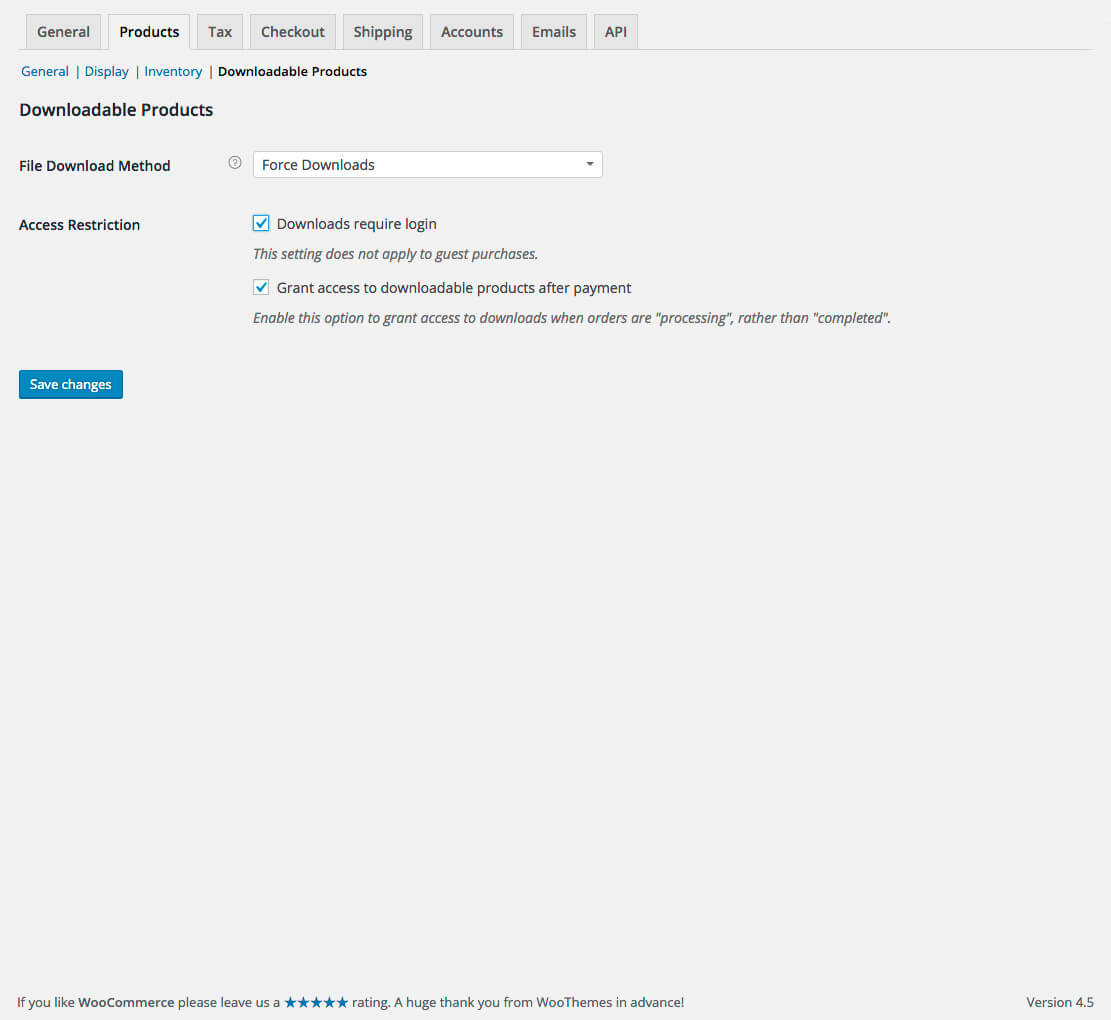
File Download Method – Generally force download is best.
Access Restriction – Should the user be logged in or not to download product.
– Grant access to downloadable products after payment enable whether to give access to the down able product after payment or not.
Tax Tab
Tax Options
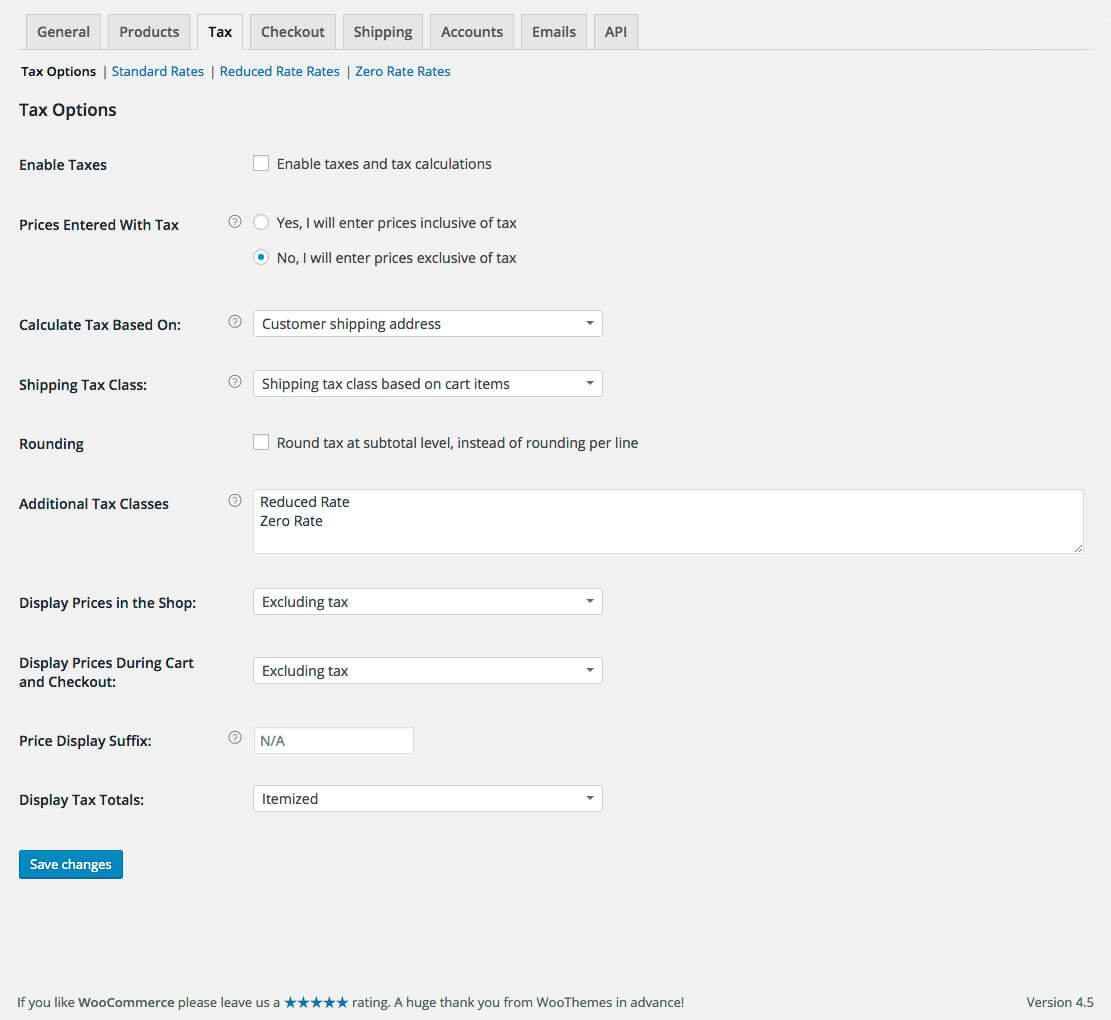
If you are not registered for GST this section can be skipped, just make sure that Enable Taxes checkbox is unchecked. If you are registered for GST, let’s run through the tax configuration options.
Enable Taxes – Yes, this will need to be enabled to charge GST.
Prices Entered With Tax – Select whether your product pricing will include GST or not.
Calculate Tax Based On: – This should set to Customer Shipping Address or Customer billing Address, although as we are only selling to Australia customers, it could be set Shop Base Address.
Shipping Tax Class – Set to Shipping tax class based on cart items
Rounding – Leave unchecked
Additional Tax Classes – This can be ignored
Display Prices in the Shop: Include/exclude tax in prices on shop and product pages?
Display Prices During Cart and Checkout: Include/exclude tax in Cart and Checkout price display?
Price Display Suffix: Enter suffix to tax output, best to leave blank
Display Tax Totals: Set to itemised.
Standard Rates
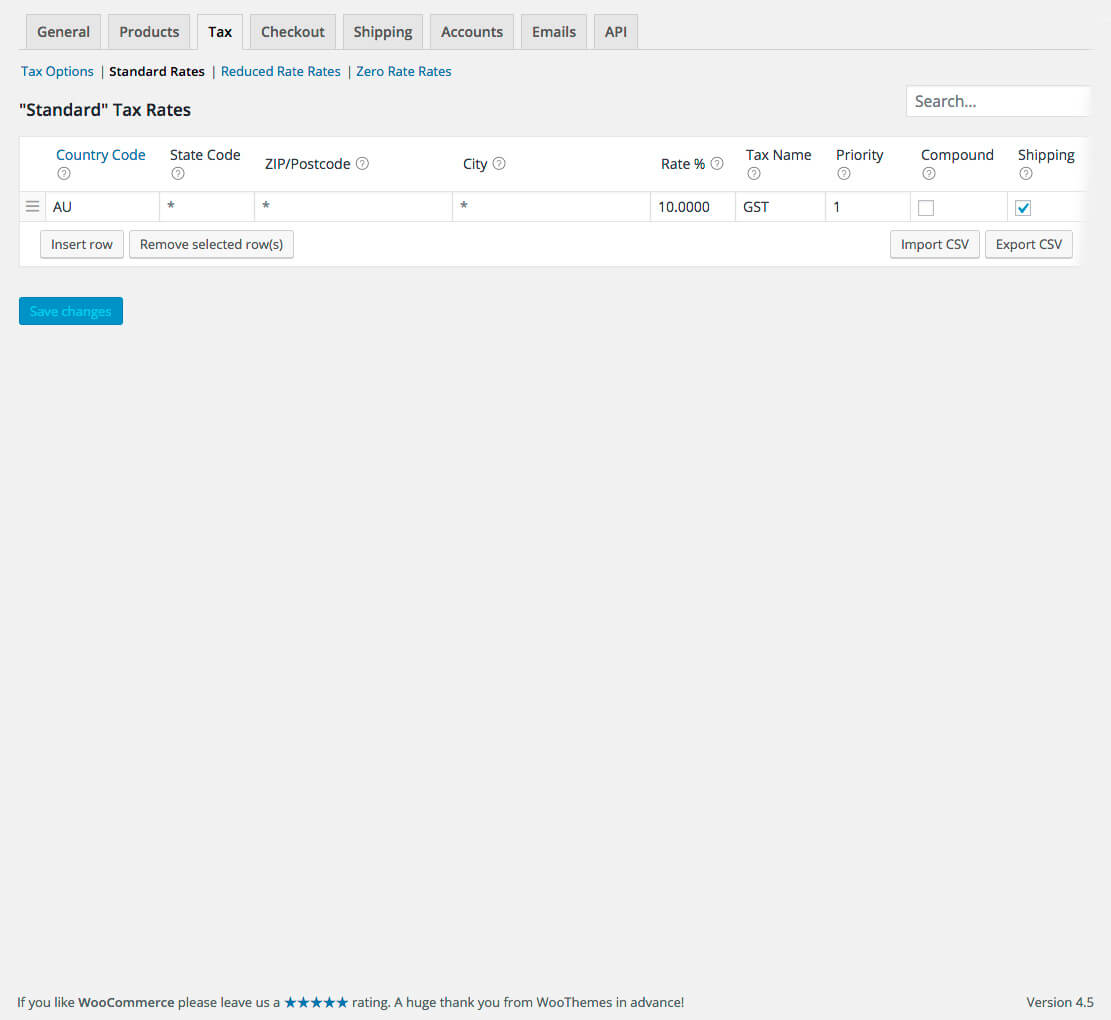
Moving to the “Standard Rates’ tab, we will now add GST as the standard rate. Clicking on the insert on button, a row of cells will appear above the button. As GST is national tax, we only need to fill out some of these fields. Clicking on the Country Code cell enter AU and Australia will appear in a dropdown menu select Australia, and then tab across to the Rate cell and enter 10, and tab across tone cell to Tax Name and enter GST. The shipping cell should have the checkbox ticked, finally save your changes.
You can also import the Australian GST tax rate via this csv file, Australian GST WooCommerce Tax.
Checkout Tab
Checkout Options
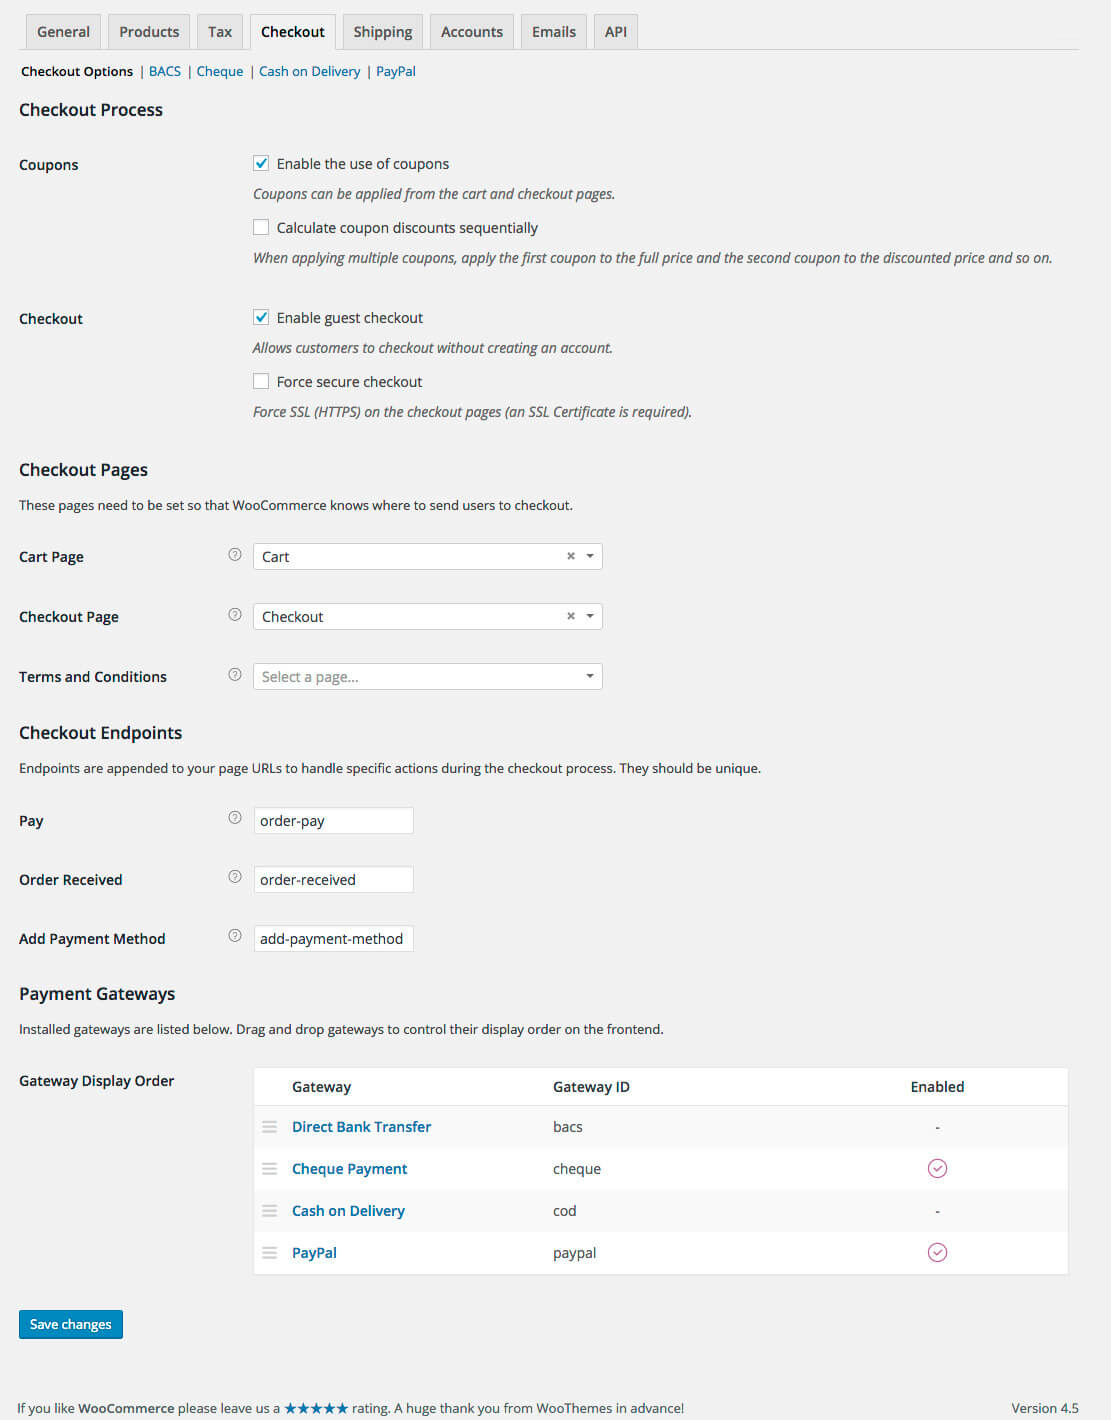
Coupons – Are you going to offer discount coupons or not? Best to leave blank if undecided.
Calculate coupon discounts sequentially – If having coupons, can multi coupons be used sequentially or not?
Checkout – Enable guest checkout do you what to our customers to purchase items without creating an account.
Force secure checkout – Force SSL protocol, if you have an SSL installed this should be ticked.
Checkout Pages
Cart Page – The page that your cart will display on, this should match the configuration that was set during the on boarding process, otherwise adjust as required.
Checkout Page – The page that your checkout sequence will display on, this should match the configuration that was set during the on boarding process, otherwise adjust as required.
Terms and Conditions – If you have Terms and Conditions for your store, set the page that outlines your terms and conditions. Also note in setting this will create checkbox in the checkout process that the customer will have to agree to to complete checkout.
Checkout Endpoints
Best to leave settings as default.
Payment Gateways
Gateway Display Order – Set the order of the payment gateway options, use the hamburger icon on the left to drag ’n’ drop the gateways into your preference display order.
BACS
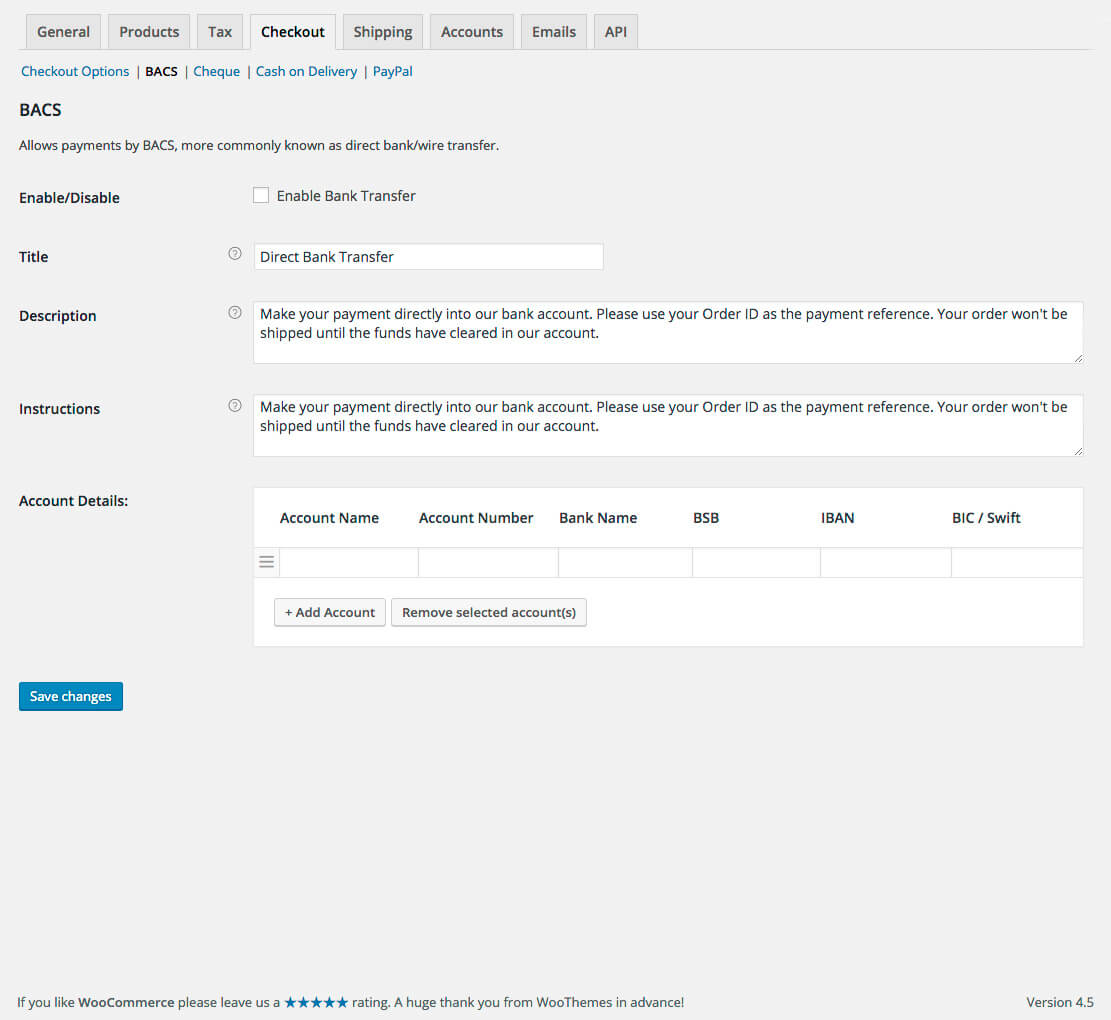
BACS – If you wish to offer bank money transfer available for payment, enable checkbox and review the Description and Instructions fields, then add your bank account details into the table.
Cheque

Cheque – If you wish to offer Cheque Payment available for payment, enable checkbox and update the Description and Instructions fields with your postage details.
Cash on Delivery

Cash on Delivery – If you wish to offer cash on delivery available for payment, enable checkbox and update the Description and Instructions fields with your details and terms, enter which shipping methods COD is available for. Lastly uncheck Accept COD if the order is virtual.
PayPal

PayPal is great payment gateway that trusted by the majority of internet users, so it is a great payment gateway to have activated.
Title – Leave as PayPal.
Description – Leave as is.
PayPal Email – Enter the email address used by your Paypal account, this should match the configuration that was set during the on boarding process, otherwise adjust as required.
PayPal Sandbox – Leave unchecked.
Debug Log – Leave unchecked.
Advanced options – Best to leave these as default.
API Credentials – Although these are optional, I would recommend following the instructions (here) and enter the your Api credentials so refunds can be automatically process from your WordPress Dashboard.
Save Changes!
Stripe

The Stripe payment gateway requires a SSL certificate to be installed for your website, so if you do not have one installed you will to be able to use this gateway. Please check with your host to determine if one is installed.
Title – Leave as Credit card (Stripe).
Description – Leave as pay with your credit card via Stripe.
Login to Stripe and generate some api keys in your account settings https://dashboard.stripe.com/account/apikeys and enter the API keys in respective field here.
Live Secret Key
Live Publishable Key
( If you wish to run some tests, you can generate test API key in Stripe and enter the keys in the Test settings )
Capture – Tick the Capture charge immediately checkbox.
Stripe Checkout – If you wish to use the Stripe default checkout pop up modal, tick this checkbox.
Stripe Checkout locale – Select the language of choice for the payment instruction tho be in.
Bitcoin Currency– Leave un ticked!
Stripe Checkout Image – An option to add your business logo to Stripe payment screen.
Saved Cards – Tick Enable Payment via Saved Cards checkbox.
Logging – Leave unchecked.
Save Changes!
Shipping Tab
Shipping Options

Shipping Calculations – Check Enable shipping checkbox.
– Check Enable the shipping calculator on the cart page checkbox.
– Optionally, check Hide shipping costs until an address is entered checkbox.
Shipping Destination – Set the default shipping address, or only ship to billing addreess
Restrict shipping to Location(s) – Set to ship to all countries you sell to
Shipping Methods – set the order of how the available shipping methods will be displayed, use the hamburger icon on the left to drag ’n’ drop the methods into your preference order.
Save Changes!
Flat Rate – Settings

Enable/Disable – Check to enable this shipping method.
Method Title – Title for this shipping method on the front end in the checkout process.
Availability – Set to allowed countries.
Tax Status – Set to taxable if your charging GTS, otherwise set to none.
Cost – Set you flat rate shipping price.
Save Changes!
Free Shipping
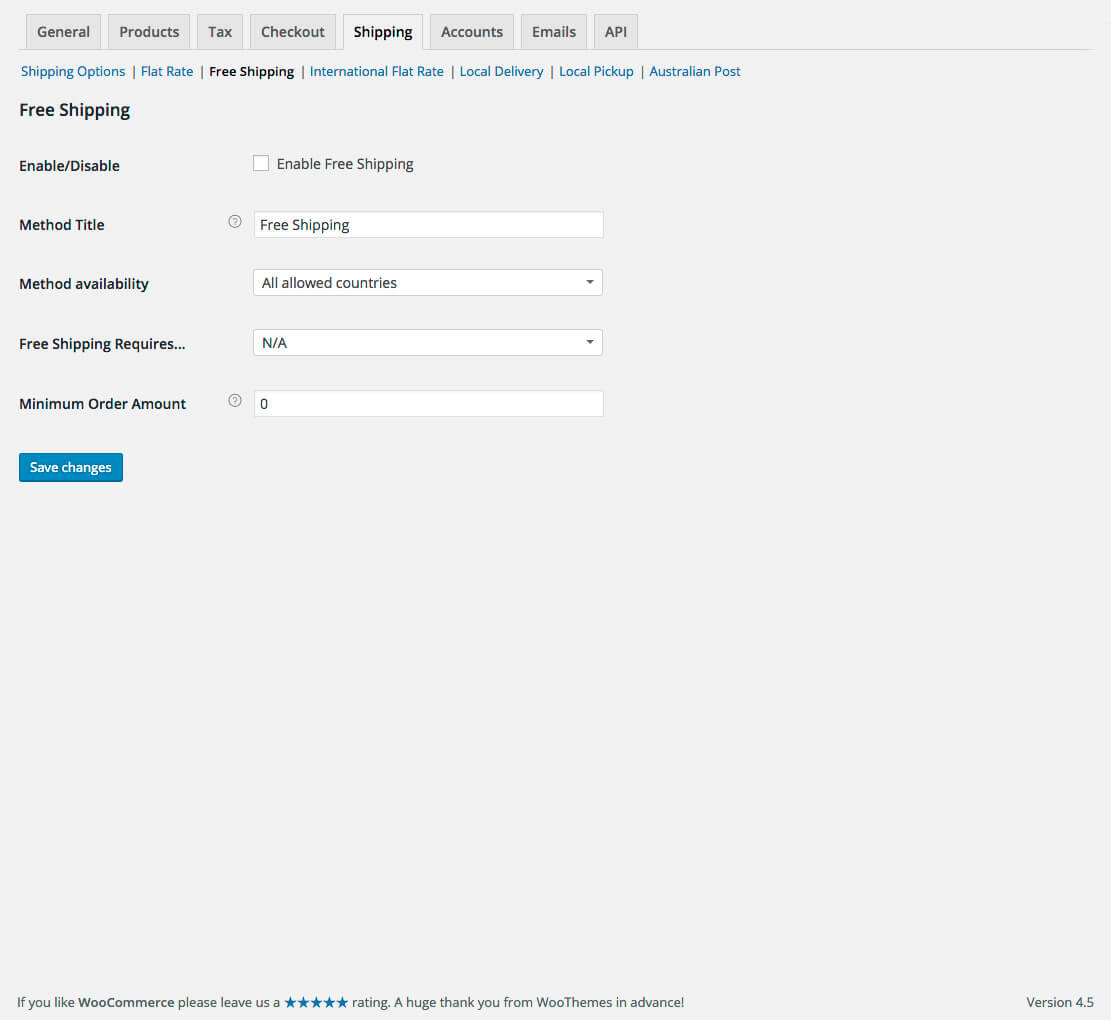
Enable/Disable – Check to enable this shipping method.
Method Title – Title for this shipping method on the front end in the checkout process.
Availability – Set to allowed countries.
Free Shipping Requires… – Set the requirements for the order to receive free shipping.
Minimum Order Amount – Set the required total cost amount to receive shipping.
Save Changes!
International Flat Rate
Skip this method delivery as we are only going to serve customers in Australia.
Local Delivery

Enable/Disable – Check to enable this shipping method.
Title – Title for this shipping method on the front end in the checkout process.
Fee type – How is the cost calculated.
Delivery Fee – Delivery Cost.
Allowed ZIP/Post Codes – Enter which in postcodes Local Delivery is allow.
Availability – Set to allowed countries.
Save Changes!
Local Pickup

Enable/Disable – Check to enable this shipping method.
Title – Title for this shipping method on the front end in the checkout process.
Fee type – How is the cost calculated.
Allowed ZIP/Post Codes – Enter which in postcodes Local Delivery is allow.
Availability – Set to allowed countries.
Save Changes!
Australia Post Settings

Enable/Disable – Check to enable this shipping method.
Title – Title for this shipping method on the front end in the checkout process.
API Key – Australia Post API settings, could use default or generate your own Api keys via link below.
Shop Origin Post Code – Enter the postcode of your shop base, i.e. where the product will be sent from.
Default Package Weight – Default product weight.
Default Package Width – Default product width.
Default Package Height – Default product height.
Default Package Length – Default product length.
Enable Debug Mode – Uncheck.
Delivery Time – Check if you would like to show an estimated delivery time on the Checkout page.
Save Changes!
Accounts
Account Pages

My Account Page – Use default “My Account”.
My Account Endpoints – Best to leave these alone as editing them could generate errors.
Registration Options
Enable Registration
Select whether to have a registration form on the Checkout and My Account page if the user is not sign in.
Select whether to display returning customer login reminder on the “Checkout” page.
Account Creation – Both “Automatically generate username from customer email” and “Automatically generate customer password” should be checked.
Save Changes!
Emails

Email Notifications – The modification of the default email notifications requires changes in the templates files, so it best to leave these to an experienced developer.
Email Sender Options
“From” Name – Enter your store or personal name.
“From” Address – Enter the email address that notifications come from.
Email Template
Header Image – Enter the Url to a business logo image file to appear at the top of all WooCommerce Emails.
Footer Text – Text that will appear at the bottom of all WooCommerce Emails. We would recommend contact details and social media links.
Base Colour – Option to adjust the base colour of the email to your branding colours.
Background Colour – Option to adjust the background colour of the email to your branding colours.
Body Background Colour – Option to adjust the body background colour of the email to your branding colours.
Body Text Colour – Option to adjust the body text colour of the email to your branding colours.
Save Changes!
API Tab

General Setting API It is best to leave all the settings with the API tab on the default settings.
Adding a Product
Now that our store functionality is setup we will now populate our store with some products to see how our store looks and functions onto front end. Navigate to Products > Add New, to which a standardise WordPress edit screen will load up, with the following components – Title field, Editor metabox, Product Short Description metabox, and lastly the standard metaboxes down the right side.
To add a product to your store these components correspond to the following areas on you product page.
Title – The title of your product
Editor – This is for the long description of your product and will appear under the description tab on the product page.
Product Data – Entails all the product specific data like SKU, pricing, size etc
Product Short Description – This is like an excerpt for a normal post this text appears under the title and product data on the front end.
Metaboxes – The standard metaboxes are present, like Publish, Categories, tags and product image provides the main/featured image for the product, along with a product gallery metabox to generate a product gallery on the front end.
The Product Data tab contains the main configuration controls for each product, as we want to populate some products to see how our store looks we will not run through all the options here, just the basic to get you started. WooCommerce has some great documentation and videos on the product data that you can view here ( https://docs.woothemes.com/document/managing-products/)
Start generating couple of products by a adding product with some basic information, like title, description, price and feature image. Or you can import WooCommerce’s dummy data by downloading here, and then importing it via the WordPress import tool in your dashboard Tools > Import.
Once you have 4 or 5 products it’s time to check out what your store will look like on the front end. Open a new browser and type in your website address in the Url bar followed by /shop/, ie http://your-web-address.com/shop/. Your website should load with your products displaying in a three column grid.
Congrats, your e-store website is up an running!
At this point you should run through some tests to see what is working and what is not. Run though a couple of test purchases, either set the payment gateways you are using to sandbox mode or drop your product pricing to something low, test purchases can easily be refunded too.
Now as you run through a couple purchasing tests I am sure that your are not 100% happy with the way your website looks. It’s time to implement one of our Genesis themes.
In next blog post of this series we will run through setting up Genesis theme with WooCommerce.


Leave a Reply