

Genesis Theme Integration
We set up our online store in the WooCommerce & Genesis Theme setup – Part 1 blog post last week, now it’s time to select and add a theme to our store.
Let’s dive in straight in to it.
As usual in your dashboard navigate to Appearance > Themes and click the Add New button. A page will load up that looked very similar the plugin page, but this time it is all about themes that you can install. As we are setting up a e-commerce store with WooCommerce, it is best we select a theme that accommodates styling and functionality for WooCommerce.
Some great Genesis themes that are built for WooCommerce are Jessica, Line it up , Paton and Novelity. But that said, you do not have to use a theme built for the WooCommerce, and if you think a certain design is better suited to your audience or branding, you should select this one.
For this tutorial we are going to run through setting up a theme StudioPress’s Daily Dish Pro, a traditional based design that I think will make a great looking simple online store. Daily Dish Pro is not built for WooCommerce, so we will run through the steps to demonstrate how it is done.
To start with let’s login to your StudioPress account and download both the Genesis Framework theme and the Daily Dish Pro theme. ( Purchase the theme, non affiliate link) Once downloaded to your computer we can install the themes to your website, navigate to Appearance > Themes and click on the Add New Button at the top of the page, and then the upload theme button. (Which is in the same spot as the Add New button on the refreshed paged.)
We can only install one theme at a time, so firstly upload the Genesis Framework zip file that you just downloaded but do not activate the theme. The Genesis Framework theme is a parent theme it does not need to be activated, it just needs to be installed in the same WordPress install. Next upload and install the Daily Dish Pro theme and activate upon installation.
Upon activation you should see a admin error notification at the top of the page that says:

To correct this issue we need to install two plugins, one is called Functionality by Shea Bunge, and the second is called Genesis Connect for WooCommerce by StudioPress. Navigate to Plugins > Add new, then search and install each plugin as per previous plugin install instructions in part one post of this series.
It is best to first install and activate the Functionality plugin by Shea Bunge. Upon activation of the Genesis Connect for WooCommerce a full screen message will appear with the following notice.
Sorry! In order to use the Genesis Connect for WooCommerce plugin you need to do the following:
Add this code to your child theme’s functions.php:
add_theme_support( ‘genesis-connect-woocommerce’ );
« Back
Copy the add_theme_support( ‘genesis-connect-woocommerce’ ); to your clipboard and click the browser back button and then navigate to Plugins > Edit Functions. On the new admin screen you will see the white box with the following code within it.
<?php
/*
Plugin Name: Your website name
Plugin URI: http://your-website-url.com
Description: A site-specific functionality plugin for (Your website name) where you can paste your code snippets instead of using the theme's functions.php file
Author: Studio
Author URI:
Version: 2016.04.18
License: GPL
*/
Just below this code, paste the add_theme_support( ‘genesis-connect-woocommerce’ ); text into this box and click the Update File button at the bottom of the page. If you have done this correctly, the WooCommerce error message should now disappear.
Without getting too technical the Genesis Connect for WooCommerce helps WooCommerce and your Genesis theme sort out which page template to use for certain areas of your website, because in these particular areas they both have certain page structures which can often conflict with each other
Adding a website pages
With our theme implemented we can now start to configure the website menus, page templates and sidebar widget. But before you do this it is our suggestion that you add any non store pages like your about page, contact page and terms conditions, and populate the pages with content if you have not so already. Navigate to the Pages > Add new menu in your dashboard to do this. Create a new page for each page that you would like to appear on your website.
A basic list of pages to add would be:
- About
- Contact/Address Details
- Legals/Terms & Conditions
- Returns Policy
You don’t have create all of them now, as you can come back at any time to create a page. Now that we have pages in the system, let’s set up a menu to allow our users to navigate around our website.
Menu Set up
Daily Dish Pro comes with two menu locations, the primary menu is below the website header, and the second menu appears above the website header.
Let’s set up the primary menu first, in your WordPress dashboard navigate to Appearance > Menus. Most of what you should see is a greyed out elements on the page. This because there are no menus available. To create your first menu, enter a menu title in the Menu Name field and click the Create Menu button on the right side of the screen. The menu name can be any word really, it more for reference purposes for when there are multiple menus.
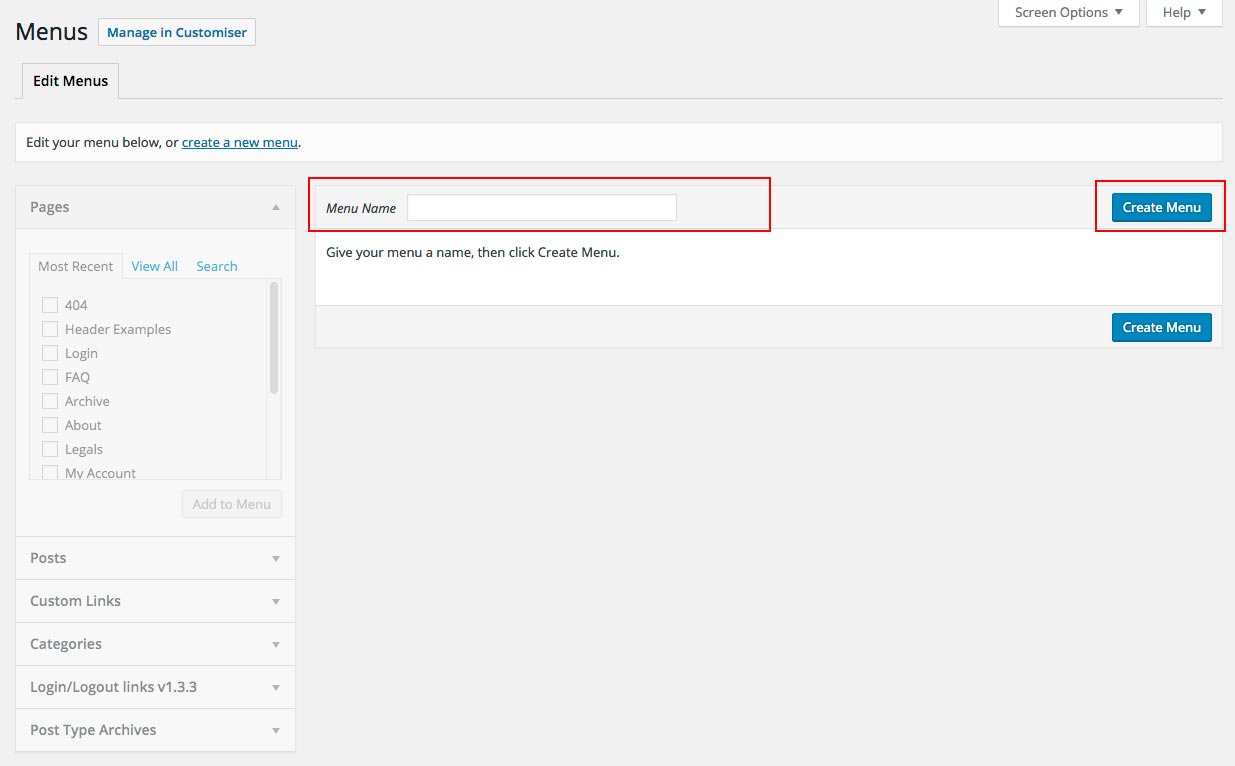
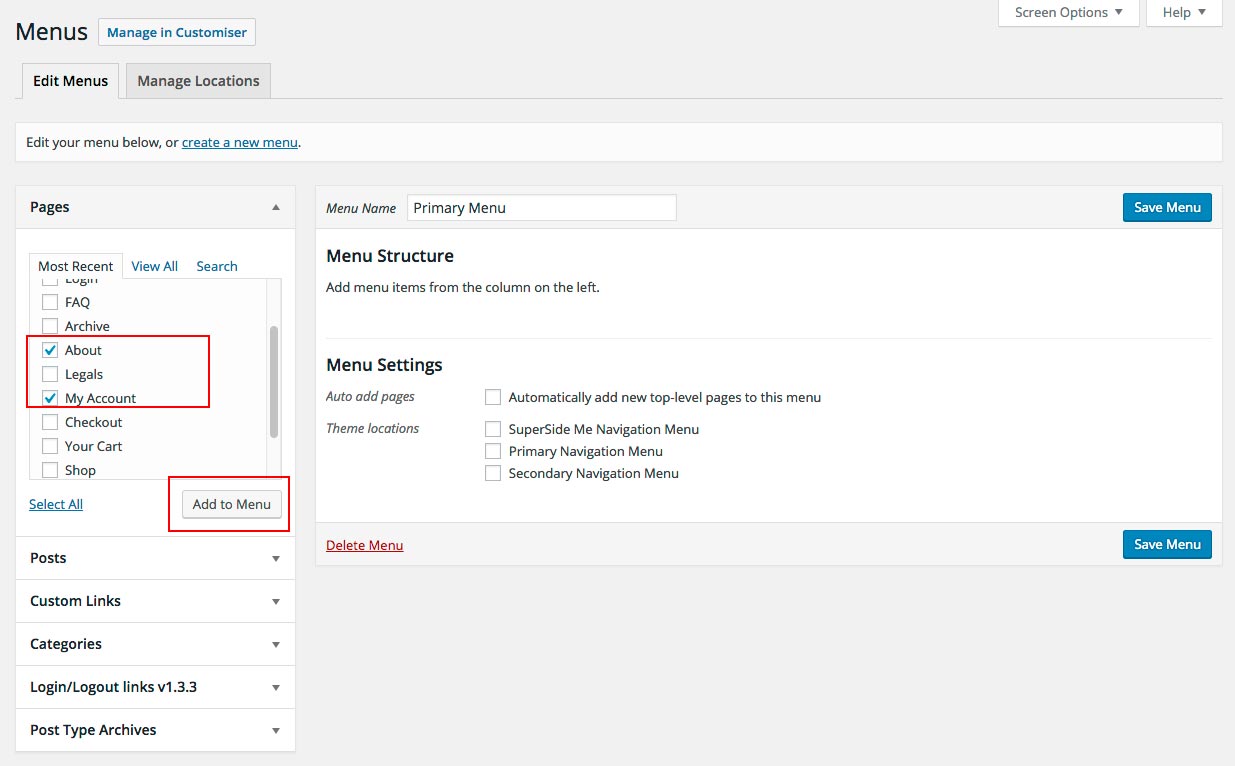
Once your new menu has been created the meta boxes on the left will no longer be greyed out, and you will be able to add elements from your website into the menu. To do this click the corresponding checkbox of the element that you wished to add and then click the Add to Menu button. Note, multiple elements can be added at the same time. As we are setting up the main navigational menu for the website, we will add the following pages – About, Shop, My Account and Contact.
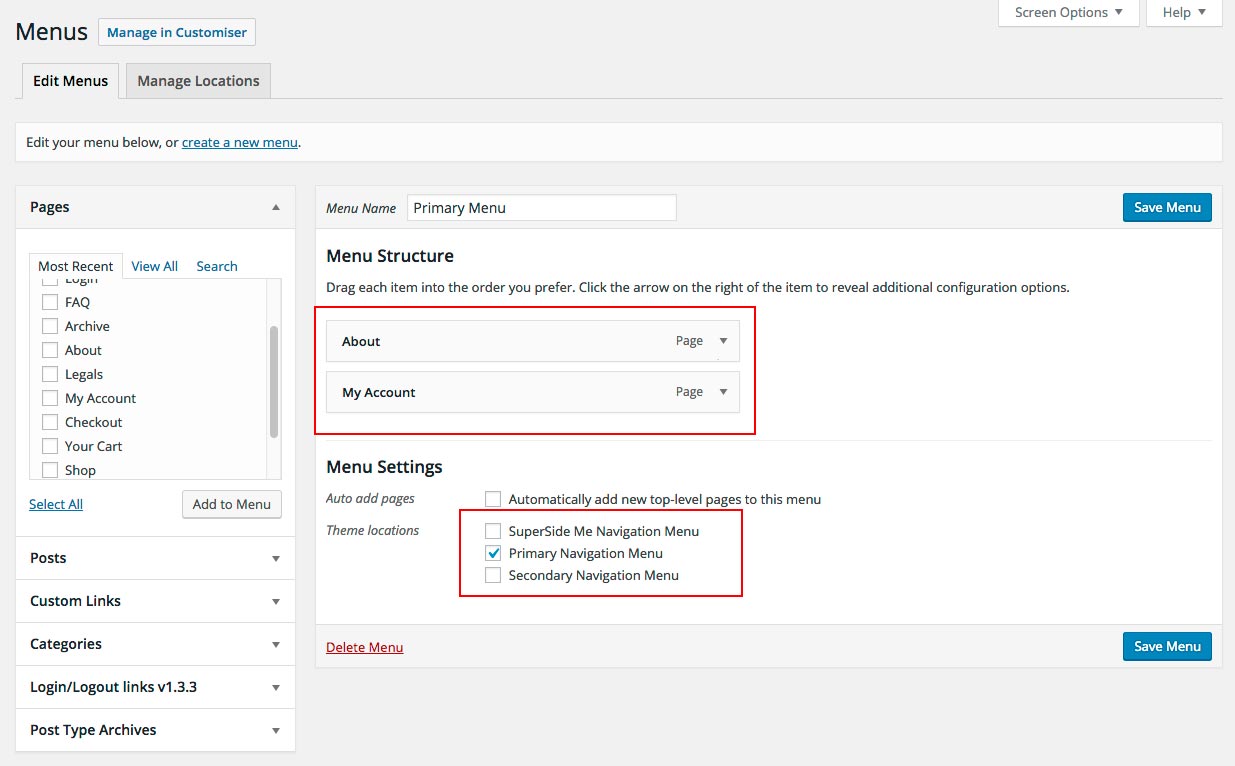
After the menu items have being added to the menu they will appear in the Menu Structure window on the right. You can drag and drop the menu items into the order you would like them to appear, and if you click on the grey triangle on the right side you can edit the menu item title. As an example we could change the “My Account” page menu item to “Account” for simplicity. For the menu to appear on the front end of your website simply check the location checkbox that you would like the menu to appear in under Menu Settings. As this is our main menu we are going to tick the Primary Navigation Menu check box. Once you have completed implementing the menu structure save off your changes, and repeat the process for the secondary menu area.
Website Layout
The Genesis Framework allows the page layout to be set for an overall website layout, but also on a page by page basis. To set the overall layout i.e. default layout for your website, navigate (in your WordPress Dashboard) to the Genesis menu item and scroll down to the Default Layout metabox.
There should three options with the Daily Dish Pro theme. Sidebar left, Sidebar right and full width layout (no sidebar). Depending on the amount of products you have, you may or not need a sidebar. If you have few products I would suggest not having a sidebar and instead use the menu items to assist in product catalog navigation for users. If you have a large selection of products and or you have a number of different types of products, a sidebar with product category and tag navigational links could be useful for your users in navigating around your product catalog.

For the purposes if this tutorial, select sidebar right and scroll down to the bottom of the screen or back up to the top of the page and save the settings.
Sidebar Content
In WordPress to populate the sidebar area with content we use widgets, which are little blocks of code that are used to pull various information from within your website or from an external website.
Navigate to Appearance > Widgets, at first sight this page will seem a little confusing. However, it is a quite simple concept what is been displayed here. On the left (first two columns) are widgets ‘packets of functionality’ and on the right (the white boxes ) are the designated widgets areas of your theme, these are areas that has been deigned to take these widgets.
To populate the sidebar area we are going to add widgets to the Primary Sidebar area. From the left side of the screen drag and drop the widgets elements that you would like to see in the primary sidebar area. As we are setting up an online store adding widgets like WooCommerce Basket, WooCommerce Product Categories, WooCommerce Product Tags or WooCommerce Product Search to sidebar area are good way of adding product navigational elements for the user. Review the available widgets on the left side of the screen and add the widgets that you would like to see in your sidebar area.
And so there are the basic steps to setting up a WooCommerce website with a Genesis Framework theme. Have any questions? Shoot through a comment in the comment form below.

Leave a Reply